
Form tools
step by step, one section per tool.
Pick the tool in a connection's Form tool field, then follow its steps below. The same steps appear on the connection's Setup step under How to connect. Every connection is protected by its secret link; tools that sign their requests add a signature check, and many others can send a secret header.
01Which tools, and how they are protected
Form Bridge sorts the tools into three kinds. The kind is shown next to the tool's name in the Form tool drop-down.
| Form tool | Kind | Protection on top of the secret link |
|---|---|---|
| Webflow | Signed | Signature (webhooks created through the Webflow API) |
| Framer | Signed | Signature |
| Typeform | Signed | Signature |
| Tally | Signed | Signature |
| Google Forms | Signed | Signature (by the Apps Script Form Bridge gives you) |
| Gravity Forms | Documented format, not signed | Optional secret header |
| Elementor Forms | Via Universal webhook | None possible: the secret link only |
| WPForms | Via Universal webhook | Optional secret header |
| Fluent Forms | Via Universal webhook | Optional secret header |
| Contact Form 7 | Via Universal webhook | Optional secret header |
| Jotform | Via Universal webhook | None possible: the secret link only |
| Universal webhook | Universal | Optional secret header |
- Signed: the payload format and the signature scheme follow the tool's official documentation. Once you save a signing secret on the connection, every request must carry a valid signature; anything else is refused with HTTP 401.
- Documented format, not signed: the payload format follows the tool's documentation, but the tool does not sign requests. A secret header can add a second check.
- Via Universal webhook: the tool does not publish its payload format, so the Universal adapter reads whatever the form sends, with settings that fit the tool. Always send a test submission and check the fields on the Mapping step.
On the connection's Setup step, under Protection, type the secret or click Generate, then Save secret. Form Bridge needs at least 16 characters and stores the secret encrypted. Use exactly the same value in the form tool. Without a saved secret, requests are accepted on the secret link alone and the log shows the signature as "Not checked (secret link only)".
The page shows the full webhook link only right after you create the connection or click Create a new link. Copy it before you save anything else on the page. Creating a new link is harmless before the form tool uses the old one.
02Webflow Signed
- Create the connectionForm tool: Webflow. Copy the webhook link.
- Create a Webflow webhookfor the trigger
form_submissionwith the link as its URL. Webhooks created through the Webflow API are signed; webhooks added in the Webflow dashboard are not. - Signed webhook: save the secretSave the secret key Webflow returned for the webhook (or your OAuth app's client secret) as the signing secret in Form Bridge.
- Dashboard webhook: leave the signing secret emptyA dashboard webhook sends no signature, so with a saved secret every request would be refused. The secret link protects it.
- Submit the form oncethen open Mapping. Fields arrive under the names of your Webflow form inputs.
Only the form_submission trigger is accepted. Signed Webflow requests also carry a timestamp: a request older than Signature age (Settings, default 300 seconds) is refused as a replay. Webflow's submission id is used to recognise a repeated delivery.
03Framer Signed
- Create the connectionForm tool: Framer. Copy the webhook link.
- In Framerselect the form and choose Send To › Webhook. Paste the link.
- Set the secretType a secret of at least 32 characters in Framer and save the same value as the signing secret in Form Bridge.
- Publish the sitesubmit the form once, then open Mapping.
Fields arrive under the names of your Framer inputs. The Framer-Webhook-Submission-Id header is used to recognise a repeated delivery.
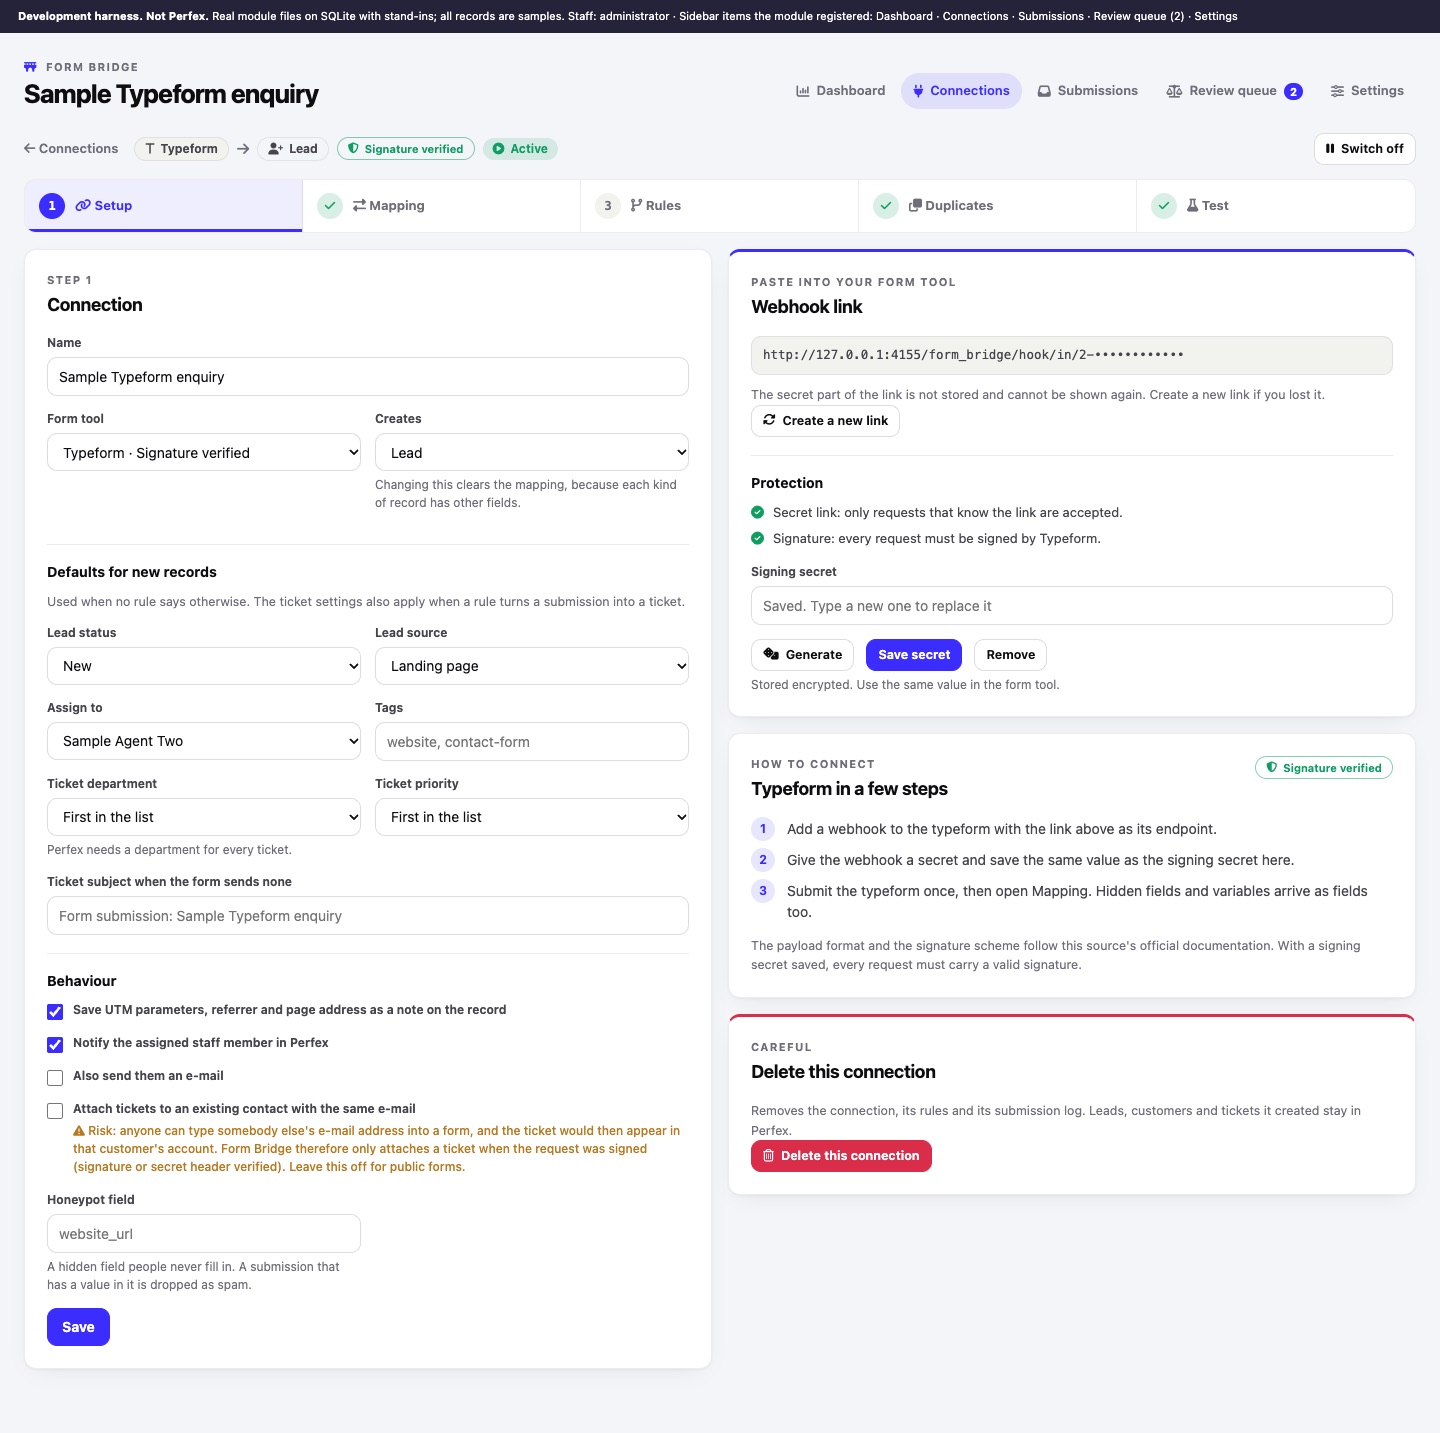
04Typeform Signed
- Create the connectionForm tool: Typeform. Copy the webhook link.
- Add a webhook to the typeformwith the link as its endpoint.
- Set the secretGive the webhook a secret and save the same value as the signing secret in Form Bridge.
- Submit the typeform oncethen open Mapping.
Answers are keyed by each question's ref (or id) and the question text is shown as the label. Hidden fields arrive under their own names, variables as variable.<name>, and a calculated score as score. Choices arrive as their labels. Only the form_response event is accepted.
05Tally Signed
- Create the connectionForm tool: Tally. Copy the webhook link.
- In Tallyopen the form's Integrations and connect Webhooks with the link.
- Set the secretAdd a signing secret in Tally and save the same value in Form Bridge.
- Submit the form oncethen open Mapping.
Choices arrive as their texts, file uploads as their URLs, and hidden fields under their own names (utm_source, ref …). Only the FORM_RESPONSE event is accepted.
06Google Forms Signed
Google Forms has no webhook of its own. Form Bridge gives you a small Google Apps Script that sends each response to the connection and signs it.
- Create the connectionForm tool: Google Forms.
- Create the signing secretUnder Protection click Generate, copy the value somewhere safe, then click Save secret.
- Get a script with the full linkSaving the secret reloads the page, and the script then shows the link without its secret part. Click Create a new link: the script under How to connect now contains the full link.
- Copy the scriptwith Copy script.
- Open the Apps Script editorIn your Google Form choose More (three dots) › Apps Script and replace the editor content with the script.
- Paste the secretReplace
PASTE_THE_SIGNING_SECRET_HEREinSIGNING_SECRETwith your signing secret and save. - Run "install" onceChoose the function
installand press Run. Google asks you to allow the script. This adds the trigger that sends every new response. - Submit the form oncethen open Mapping.
Answers arrive as q_<question id> with the question text as the label. If the form collects e-mail addresses, the respondent's address arrives as respondent_email. Requests older than Signature age (default 300 seconds) are refused.
07Gravity Forms Documented format, not signed
- Create the connectionForm tool: Gravity Forms. Copy the webhook link.
- Add a webhook feedWith the Gravity Forms Webhooks Add-On, open the form's Settings › Webhooks and add a feed.
- Set the feedRequest URL: the link. Request Method: POST. Request Format: JSON. Request Body: All Fields.
- Optional: secret headerAdd a request header with the name shown under Protection (default
X-Form-Bridge-Secret) and your shared secret as its value, and save the same secret in Form Bridge. - Submit the form oncethen open Mapping.
With All Fields, fields are listed by their Gravity Forms field id (1, 1.3, 2 …) and entry properties such as the IP or the user agent are left out. The entry id is used to recognise a repeated delivery, and the page address is kept for the context note.
08Elementor Forms Via Universal webhook
- Create the connectionForm tool: Elementor Forms. Copy the webhook link.
- In the Elementor form widgetopen Actions After Submit and add Webhook.
- Paste the linkinto the Webhook field and update the page.
- Submit the form oncethen open Mapping and check the fields that arrived.
Elementor cannot sign requests or send a header, so the secret link is the only protection. Keep it private.
09WPForms Via Universal webhook
- Create the connectionForm tool: WPForms. Copy the webhook link.
- Add a webhookWith the WPForms Webhooks addon, open the form's Settings › Webhooks and add a webhook.
- Set itRequest URL: the link. Request Method: POST. Request Format: JSON.
- Request BodyAdd one row per field: a key you choose and the form field it sends. These keys are the names you will see on the Mapping step.
- Optional: secret headerAdd a request header with the name shown under Protection and your shared secret as its value.
- Submit the form oncethen open Mapping.
Multi-value answers separated by || are shown as a comma separated list. If you send a key entry_id, it is used to recognise a repeated delivery.
10Fluent Forms Via Universal webhook
- Create the connectionForm tool: Fluent Forms. Copy the webhook link.
- Add a Webhook integrationin the form's Settings & Integrations (Fluent Forms Pro).
- Set itRequest URL: the link. Request Method: POST. Request Format: JSON. Send all fields.
- Optional: secret headerAdd a request header with the name shown under Protection and your shared secret as its value.
- Submit the form oncethen open Mapping.
11Contact Form 7 Via Universal webhook
- Install a webhook add-onContact Form 7 needs an add-on that sends webhooks, for example "CF7 to Webhook".
- Create the connectionForm tool: Contact Form 7. Copy the webhook link.
- In the form's webhook settingsswitch sending on and paste the link.
- Optional: secret headerAdd a custom header with the name shown under Protection and your shared secret as its value.
- Submit the form oncethen open Mapping.
12Jotform Via Universal webhook
- Create the connectionForm tool: Jotform. Copy the webhook link.
- In the Jotform Form Builderopen Settings › Integrations, choose WebHooks and add the link.
- Submit the form oncethen open Mapping. Answers are listed under names such as
q3_name.first.
Jotform cannot send a secret header, so keep the link private. Jotform's submission id is used to recognise a repeated delivery.
13Universal webhook
For any tool or script that can send an HTTP request, including your own website code.
- Create the connectionForm tool: Universal webhook. Copy the webhook link.
- Send with POST(PUT and PATCH are accepted too). The body can be a JSON object,
application/x-www-form-urlencodedormultipart/form-data. - Optional: secret headerSave a shared secret in Form Bridge and send it in the header named under Protection (default
X-Form-Bridge-Secret; you can change the name in Secret header name). - Submit oncethen open Mapping.
Nested values are listed as address.city, lists of plain values as one comma separated value. A request can carry up to 300 fields. If your form sends its own submission id, type that field's name in Submission id field on the Setup step so a repeated delivery is recognised. Example with a secret header:
curl -X POST 'https://your-crm.example.com/form_bridge/hook/in/7-PASTE-THE-REST-OF-YOUR-LINK' \
  -H 'Content-Type: application/json' \
  -H 'X-Form-Bridge-Secret: YOUR-SHARED-SECRET' \
-d '{"name":"Sample Person","email":"sample.person@example.com","address":{"city":"Bratislava"}}'14What the webhook answers
Every answer is JSON. Form tools usually only look at the status code; you see the same information in the submission log.
| Status | Body | Meaning |
|---|---|---|
| 200 | {"ok":true,"id":12,"status":"created"} | Stored and processed. status is the new log status (received = Captured, created, updated, review, spam, failed). |
| 200 | {"ok":true,"duplicate":true,"id":12} | The same submission arrived again; nothing new was done. |
| 401 | reason | Signature or secret header missing or wrong. |
| 403 | "This connection is switched off." | The connection is off. |
| 404 | "Unknown webhook link." | Wrong or replaced link. |
| 405 | "Send the submission with POST." | Wrong method. |
| 413 | "The submission is larger than the allowed … KB." | Over the size limit. |
| 422 | reason | Not a submission in this tool's format. |
| 429 | "Too many submissions …" | Over the rate limit; Retry-After: 60. |
| 503 | "Form Bridge is not active on this site." | The module is deactivated. |
Fixes for each: Troubleshooting.